How to install Sense/Net from source package (IIS 7.5 and IIS 7.0)
- 100%
- 6.0
- Enterprise
- Community
Planned
sensenet 7: this article has a more recent version on the new community site.
Contents |
Overview
In this document we would like to guide you through the installation process of Sense/Net ECM from a source package. We hope that you will encounter no complications during installation, or later on while working with Sense/Net ECM. If you come across a bug by any chance, or have questions concerning our product, feel free to contact us at our forum.
This document describes the steps of installing Sense/Net ECM on machines with IIS 7.0 or higher version.
In case you use IIS 6.0, please read the following howto: How to install Sense/Net from source package (IIS 6.0)
Steps
In case you are an Enterprise customer and want to use the Task Management feature in Sense/Net ECM (e.g. you want to have preview images for your documents), please install the Task Management component first.
1. Download Sense/Net ECM
Download the Sense/Net ECM source package. The latest version of this package is available on our CodePlex page.
The public CodePlex page above offers Sense/Net ECM Community Edition. Customers who have access to the Enterprise Edition should use that source package. For differences between the two editions, please visit the following article:
Install MSBuild Extension Pack
If you did not install this package previously, please download and install it, as it is a prerequisite for building the Sense/Net ECM solution.
2. Extract the package
Extract the package to a folder of your choice, we will refer to this location as sourceroot later on.
3. Set up IIS
3.1 Start the IIS Manager
Start IIS Manager (Control Panel\Administrative Tools\Internet Information Services (IIS) Manager).
3.2 Check bindings
Leave bindings of the created site as set by default - you will be able to access it using http://localhost. Ensure that no other (running) site is bound to localhost.
To use another hostname you will need to configure that address in the web.config with the urlList element. However we recommend you finish the installation first using the localhost binding.
3.3 Add a new site
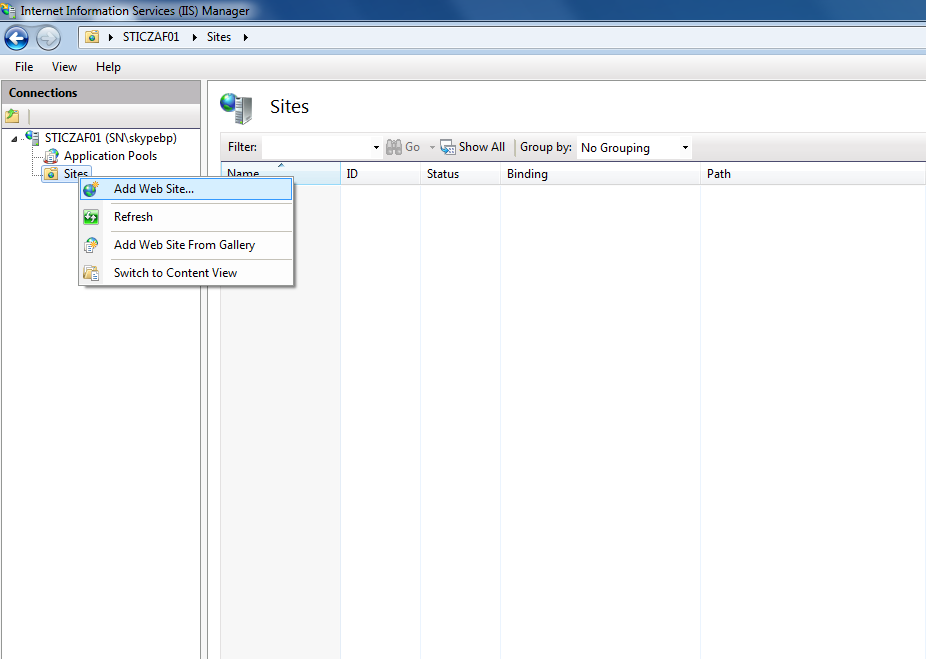
Create a new website: Right click on Sites and select Add Web Site.
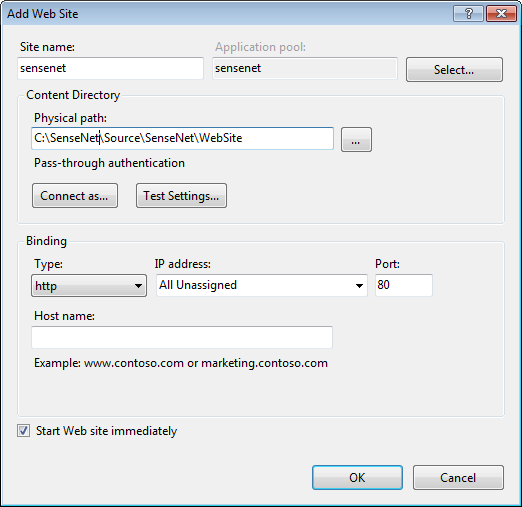
Choose a name for your site (Site name).
Set your Physical path to: %sourceroot%\Source\SenseNet\WebSite
4. Check application pool settings
Ensure that the application pool of your site is configured properly. You can find the recommended settings for each version in the following table:
| Sense/Net version | .NET Framework version of the application pool |
|---|---|
| 6.0.1 or before | v2.0 |
| 6.0.2 or later | v4.0 |
To edit application pool settings, you should follow the steps below:
4.1 Find the application pool of your site
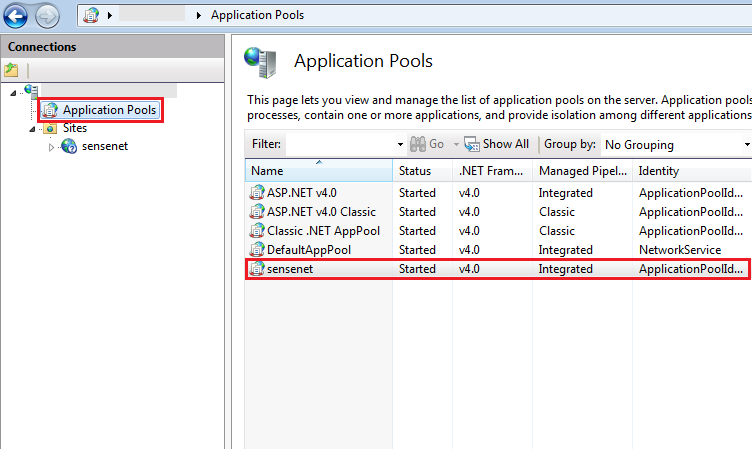
By clicking on Application pool in the upper left corner you will get the list of available application pools. If the settings of your site's application pool doesn't match the recommended settints (See table 1) you have to change it.
4.2 Select the appropriate version
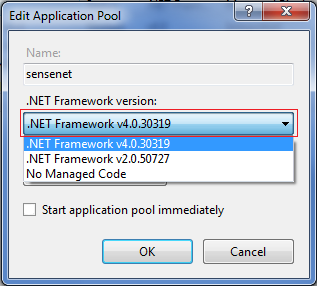
Double-click on the application pool of your site, then select the appropriate version of .NET Framework from the .NET Framework version dropdown.
5. Set up database connection
The easiest way to set up database connection is creating an Alias in your SQL Server Configuration Manager.
5.1. Open SQL Server Configuration Manager
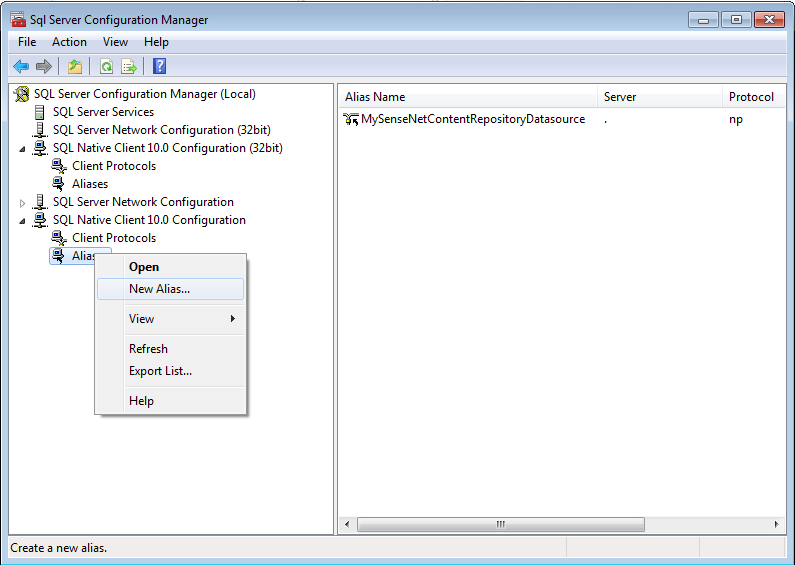
5.2. Right Click on Aliases, then select New Alias
5.3. Set up the new Alias
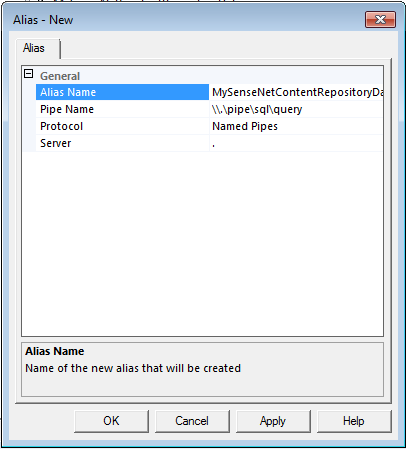
Use the values from the following table (you have to replace DB_SERVER_NAME to the name of your sql server instance)
| Property name | Property value |
|---|---|
| Alias | MySenseNetContentRepositoryDatasource |
| Protocol | Named Pipes |
| Server | DB_SERVER_NAME |
The Alias Name must be set exactly as above, please be aware of uppercase and lowercase characters and remove any leading or trailing space characters that may got there because of a copy/paste operation.
Please create an alias for every configuration. In the image above you see two Alias nodes in the tree: please create the alias for both!
5.4 Enable client protocols
Please go through the Client Protocols sections for all configurations above, and enable all protocol types (Named pipes, TCP/IP).
6. Open the solution
Open %sourceroot%\Source\SenseNet\SenseNet.sln in Visual Studio
7. Rebuild the entire solution
Rebuild the entire solution
8. Run install script
To run this script you need to have administrative rights for the SQL Server instance.
Run the install script: %sourceroot%\Deployment\InstallSenseNet.bat
If the installation fails because of dll load errors (e.g. you see "Could not load library" on the console) than make sure that all dll files in the Tools, bin, and References folders are unblocked. You can unblock files in a single folder using the Unblock-File command in Windows PowerShell:
dir "C:\SenseNet\References" | Unblock-File
dir "C:\SenseNet\Source\SenseNet\Website\bin" | Unblock-File
dir "C:\SenseNet\Source\SenseNet\Website\Tools" | Unblock-File
9. Set up permissions
The identity of the application pool running the site must be (at least) the dbowner of SenseNetContentRepository database. (Hint: if your app pool is running in the name of ApplicationPoolIdentity you may create a new login for IIS APPPOOL\<application pool name> in Microsoft SQL Server Management Studio (don't search for this user, just type it in) and grant db_owner permissions).
10. Installation finished
You can browse your application on http://localhost  .
.
Video
Related links
How to install Sense/Net from web deployment package (IIS 6.0)
How to install Sense/Net from web deployment package (IIS 7.5 and IIS 7.0)
